Scrapbooking Sketches – 8 Ways to Be More Productive

Enjoy this article on making your scrapbooking more productive.  And I hope you will join me for my upcoming Simply Scrapbooking Series on Friday, September 16, 2011.  Visit the information page for more details and to register!  The deadline to register is September 2nd!

——————————————————————————–

by Monna Ellithorpe

Your scrapbooking layouts can make all the difference in how your pages look. The key is to have many scrapbook sketches available already there for you to choose from and to help you get over those times when your own creative ideas are at a standstill.

Your pages do not have to be perfect by any means and sometimes you will produce a page that no matter what you do, you are just not happy with it. Don't stress over it, just put it in your scrapbook and move on. Remember scrapbooking is supposed to be fun, so don't make it into a chore just to get it done.

When you do find a sketch or layout that you like, experiment with it. Make your page about just one picture; add more pictures or less pictures; move them around; put the pictures on an angle; line them up and down or across. Walk away from it for a while and come back later with a fresh outlook and then just make the page and start another one.

I have discovered in my own scrapbooking sessions that if I have a sketch to go by, the hard part is already done. All you need to do is embellish with ribbons, buttons, lettering, stickers, glitter or what ever kind of embellishments you like the most. Cutting your mats and pictures with decorative scissors or if you have cutters with different cutting edges always adds a nice touch to your pages; experiment with different cutting edges.

A very important part of scrapbooking is "do not forget the journal box on your pages." In the future when family and friends look at your creative scrapbooking efforts they will want to know what was happening at the time, who is in the picture and where they were. This will keep the interest of any one viewing your scrapbook pages. It is such a disappointment when looking at a scrapbook full of pictures and you have no idea of who the people are in the pictures; no dates; no notes; nothing. Journal on every page even if you cannot remember the details, put as much information in your journal block as you can.

If you have quite a few pictures of one outing, a birthday party or some other event, it is always a plus and if you have the room to lay out many sheets of cardstock and just start laying your pictures out on each piece of cardstock as you go along. I have used this technique quite a few times and have been able to produce up to 10 pages in one session in my scrapbooking room. Believe me it is a great feeling to get so much accomplished at one time.

Below are some suggestions to help make better use of your time with your hobby:

1. Gather all of your pictures together from a single event.

2. If you have the room, lay out many sheets of cardstock and lay the pictures on the cardstock at random.

3. Have sketches available to use as a guide.

4. Gather your embellishments that you plan to use; maybe you have a theme or just plan to use whatever appeals to you at the time.

5. Decide if you are going to cut your mats and photos with a straight edge or with a decorative edge.

6. Do not forget to make a journal box for each of your pages.

7. Don't worry if you are not able to finish your pages at one time. At least you have a start and the next time you have a few minutes a good portion of the decision making has already been done.

8. Last and most important, have fun and remember the event as you work on your pages.

Always remember enjoy your hobby and don't feel as if it is another job.

For more ideas, inspiration, learning to use your limited scrapbooking time more wisely and making great looking scrapbook pages, I would like to invite you to visit http://www.squidoo.com/Scrapbook-Sketches-500 which also includes free bonuses for cardmaking ideas and Christmas quotes.

"Copyright (c) Monna Ellithorpe. All Rights Reserved."

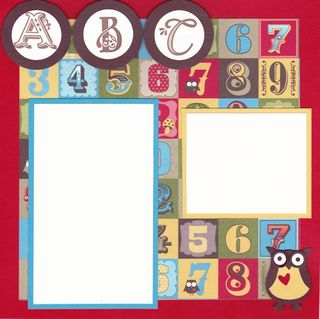
Play Date 8×8 Scrapbook Page – Guest Blogger

In honor of National Scrapbooking Month I am featuring this Guest Blogger post.  My sister and fellow Stampin' Up! demonstrator came up with adorable scrapbook page to share with us!  It's perfect for a teacher gift or for your child's school album.  It uses the adorable Play Date Designer Series Paper!  Thanks, Elaina!  Visit her blog here: http://elainascardsandcrafts.blogspot.com/

Play Date 8x8 Page
 
Supplies Used:
Stamp Set: Broadsheet Alphabet (W118724, C120585)
Card Stock/Paper: Play Date Designer Series Paper (117168) 7”x7”; Real Red Card Stock (102482) 8”x8” and scraps for punching; Tempting Turquoise CS (102067) 5-1/2”x3-1/2”; So Saffron CS (105118) 3-1/4”x2-3/4” and scraps for punching; Whisper White (100730) 3”x5”, 3”x2-1/2” and scraps for stamping; Chocolate Chip CS (102128) scraps for punching.  [Note: Card Stock item numbers refer to the 8-1/2×11 packs.]
Coloring Tools: Chocolate Chip Classic Stampin’ Pad (100908)
Tools: Paper Cutter (104152); 2-step Owl Punch (118074); 1-1/4 Circle Punch (119861); 1-3/4 Circle Punch (119850)
Accessories, Etc.: SNAIL Adhesive (104332), Stampin’ Dimensionals (104430); Multipurpose Liquid Glue (110755)

Instructions:
1. Adhere the Play Date DSP to the Real Red CS using SNAIL adhesive.
2. Punch the Owl punch, using the Chocolate Chip, Whisper White, So Saffron, & Real Red scraps, and assemble as shown in the photo.  Use the Multipurpose Glue for best results.  Adhere the assembled owl to your page using dimensionals.
3. Stamp the letters of your choice on Whisper White CS and punch out using the 1-1/4” Circle punch.  Punch Chocolate Chip CS circles with the 1-3/4” circle punch and adhere behind your stamped circles using SNAIL. Place your letters on your page using dimensionals.
4. Adhere your Whisper White CS photo mats to your Tempting Turquoise and So Saffron mats using SNAIL, then adhere them to your page using either SNAIL or dimensionals.
5. Finally, place the photos of your choice on the page, and you are finished!

I hope you enjoyed this Guest Blogger project!

Happy Crafting!

~Elisa

Plants You Grow In Your Garden Can Be Used As Embellishments!

I thought some of you, my faithful readers AND scrapbookers, would LOVE this interesting information! Let me know what you think in the comments section.

ARTICLE by John Yazo

Capturing and preserving the natural beauty of your garden can simply be done by creating a scrapbook and journal of your memories. Scrapbooking is a great way to preserve these memories and to share them with friends and family members for generations to come. There is no better feeling than to look back at these precious times and to be able enjoy their memorable moments.

Preserving flowers and plants from your garden can be done by drying or pressing them. They can be saved for years to come and can be used as embellishments in your scrapbooking and card making projects. It is a unique way to add your own personal touch and feelings to your crafts.

Small flowers and leaves can be pressed to make embellishments and larger flowers like sunflower pedals, or leaves can be dried and pressed to create a unique natural background for your scrapbook pages. Other plants like herbs can also be used to add accent when they are dried.

There are many other ways that your preserved plants can be used, such as dried flower arrangements, framed and hung on a wall as natural wall decor. The ideas are endless and the only limit is your imagination.

There are many ways you can create unique, natural scrapbooks that will keep the memories of your gardening experiences alive and able to be passed on to members of your family and friends for years to come.

Drying and pressing your flowers and plants is simple to do and can be done with common household supplies that are already available to you in your home.

Both environmentally friendly and healthy, Organic Gardening is a way of gardening in harmony with nature. Growing a healthy and productive crop in a way that is healthier for both you and the environment.

John Yazo
http://www.organicheirloomgardening.com