Buy 3, Get 1 Free – Designer Series Paper

Because we can NEVER have enough Designer Series Paper, Stampin’ Up! is having a special offer to save you money!buy 3 get 1 free dsp
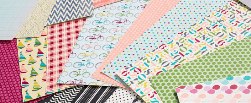
WHEN: July 1-31, 2013

DETAILS: Buy three packs of select Designer Series Paper and get one for free!

  • No limits. Order six? You’ll get two for free. Nine? You’ll get three for free.

  • Check out the Designer Series Papers in the annual catalog pages 151, 153, and 154. View the catalog online here. Fill out the “Request Your Catalog” form to get your own catalog in the mail.

  • To get your free DSP, enter it in your order separately from the three packs you’re paying for. For example, if you want four packs of the same type of paper, put in the three you’re paying for and enter the fourth as a separate item.

These items don’t qualify for the offer: DSP Stacks, Specialty DSP, Hostess-only DSP

Let me know if you have any questions about this offer! 

How I Store My Stamps

In this second post in my “Storage Series” I share how I store my stamp sets.

When Stampin’ Up! only carried wood-mounted stamp sets, I stored my stamps sideways between 2 bookends. Now that we carry clear-mount stamp sets, I only currently own FOUR wood sets, so this is what it looks like (too few to store sideways anymore!):

wood stamps on shelf

Most of my stamp sets are now clear mount, mainly because I own all the clear blocks, they take up less space on the shelf, and they are less expensive than their wooden counterparts.  I store them all in a DVD holder like this:

stamps in DVD case

I actually own 2 DVD holders, but my sister’s stamp sets are currently living in my second one. I haven’t needed it yet anyway. I do not own very many stamp sets, compared to the typically demonstrator! I try to only buy stamps to fill in “gaps” in my stamps – so if I need a flower set because mine retired, for example. I also earn free stamp sets sometimes, as a demonstrator!  It’s nice because then I can save my crafting money for paper, tools and embellishments!

How do you store YOUR stamps? Share in the comments!

“Best of Greetings” Stamp Set from Stampin’ Up!

Welcome to the “Best of Stampin’ Up!” stamp set for June… The “Best of Greetings!”

Each month I’ll post information here on my website about the NEW “Best Of” set for that month:

The Details:

  • All “Best Of” stamp sets will include 3-5 images, including a never-before seen image, and will be priced at $14.95.
  • While just one “Best Of” stamp set will be released each month (with a new theme each month), all of the “Best Of” sets will be available until March 31, 2014.
  • All “Best Of” stamp sets are available in Clear-Mount only.
  • As a special incentive to collect the “Best Of” stamps, starting in February there will be a collector’s card and 25-year proof of purchase sticker included with every “Best Of” set. Collect six stickers, and send it in to redeem a FREE set of your choice valued up to $14.95! Free sets must be redeemed no later than April 30, 2014.

DOWNLOAD the Collector’s Card HERE!

Contact me for more information or visit my page every month to see what’s NEW!

Happy Stamping with the NEW “Best of Greetings” Stamp Set from Stampin’ Up!

A Fun 12×12 Scrapbook Page for Your Boy!

May2013-ScrapThis simple but fun scrapbook page is perfect for any of your “boy” page needs! Simply by changing the title and journaling, you can have a great page for any event!

SUPPLIES:

Paper: *Parker’s Patterns Designer Series Paper (retired, substitute your new favorite DSP! Or get Parker’s Patterns MDS version!), Cherry Cobbler Card Stock (119685), Crumb Cake Card Stock (120953)

Tools & Accessories: Stampin’ Trimmer (126889), Paper Snips (103579), *Silver Basics Designer Buttons (substitute with your favorite buttons), Natural 7/16” Trim Ribbon (129287), SNAIL Adhesive (104332), Stampin’ Dimensionals (104430), Glue Dots (103683)

INSTRUCTIONS:

  1. Choose which patterns from the designer series paper you wish to use. Keep one of them as a full 12×12 for the background, and cut the other 3 pieces into 6×6” squares.
  2. Place a 8-1/2” x 11” piece of Cherry Cobbler card stock onto your background with SNAIL adhesive, towards the left of the page. Layer your 3 6×6” squares over the card stock, angling them, attaching them with SNAIL adhesive.
  3. Cut Crumb Cake card stock into two pieces: a 4-1/4” x 6-1/4” photo mat & a 4-3/4” x 7” piece for the journaling. Cut a flag end on one of the “short” sides of the journaling piece. Layer your 4×6” photo on the photo mat.
  4. Tuck the Crumb Cake journaling piece under the designer series papers so the flag end reaches the end of the background paper on the right.
  5. Adhere your photo onto the left hand side of the page, over the designer series papers, with dimensionals.
  6. Cut a piece of the Natural ribbon and fold it in half. Adhere it to the page under a large silver button, attached with glue dots.
  7. Place a couple more silver buttons where desired on the page, attached with glue dots.
  8. Add your own title and journaling and you are finished!

Let me know what you think in the comments, or send me an email if you have any questions!

Happy Scrapping!