Q&A: Help Me Fit My Stamps Into the Case!

For today’s Q&A I have a question that I had recently, with the solution!

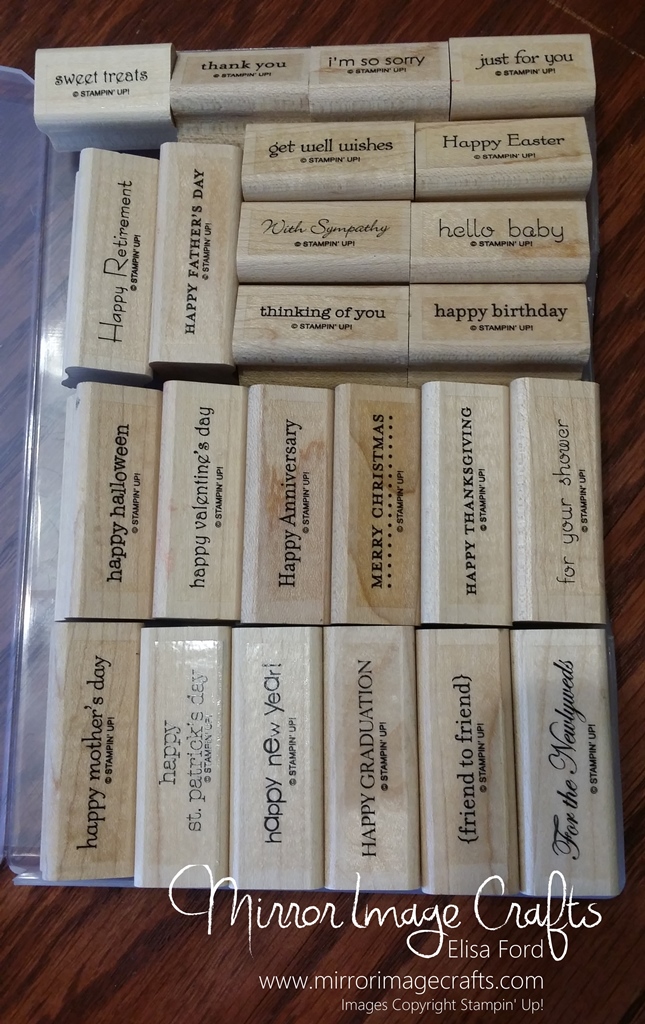
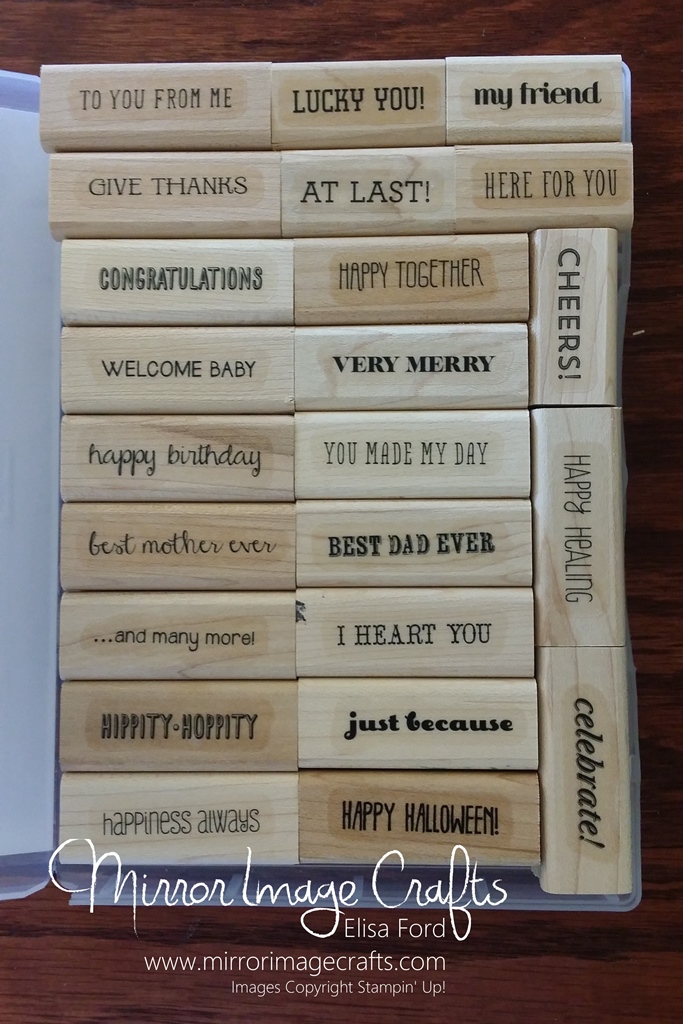
I recently held a Stamp-A-Stack in my home where we used the And Many More stamp set in wood mount. During my classes, I encourage my attendees to change the sentiment for their cards to be what they need, so I get out many stamp sets with lots of sentiments. The wood mount stamps in the new wood mount cases can be tricky to fit back into the box, if it’s a tight fit.

I searched Pinterest, YouTube, and the Stampin’ Up! demonstrator website but couldn’t find the answer to “How does “And Many More” fit back into the case?”

It took me a few minutes, but I got all the stamps to fit easily into the case, so I wanted to share the photo so you don’t have to have the same problem! Check out the photo, click it to make it larger, and/or print it to mount inside your case.

This is how And Many More fits back into the wood mount case

Bonus answer: “How does “Teeny Tiny Wishes” fit back into the case?”

This is how Teeny Tiny Wishes fits back into the case

How I Store My Craft Punches

In this sixth post in my “Storage Series” I share how I store my craft punches.

I have Stampin’ Up! punches (exclusively) in two different “body” styles. The older style, or “whale tail” is stored like this:

Punches-oldbody-storage

I LOVE storing my punches like this! I stole the idea from another demonstrator years ago. I especially appreciate how easy they are to access and see what I have. I have labeled each pocket, just so I can be sure to put the punches back where they belong.

Punches-newbody-storage

My newer body style punches are stored in my top dresser drawer in another wire basket from the dollar area at Target. My smallest punches are inside (you guessed it!) another Iris container! I will likely outgrow this storage space and need to resort to another plan soon. I’m actually considering re-doing my entire craft area in order to maximize space and attempt to keep ALL of my supplies in my craft room so that I won’t have to run between the craft area and my office to get supplies.

I’ve seen a bunch of really great storage for punches. How do YOU store your punches? Tell us in the comments!

I sincerely hope you’ve enjoyed my “Storage Series” and learned some new ideas. I’ll update as I make changes. As I’ve said before, you have to work with the space you have and the ideas that work best for you, your space, and your budget. Let me know if you have any questions!

How I Store My Big Shot Dies & Embossing Folders

In this fifth post in my “Storage Series” I share how I store my Big Shot Die-Cutting machine, dies & embossing folders.

In a previous “Storage Series” post I showed you that I keep my Big Shot Die-Cutting Machine on my craft table virtually ALL the time. So now I’ll show you where I keep all the dies and other accessories handy:

BigShot-dies-storage

My Bigz Dies all live in two top drawers of the dresser to the side of my craft table. On the far right I keep my longer dies and the extended cutting plates that go with them. On the right side of the the middle drawer I keep all my standard sized dies and their coordinating cutting plates.

BigShot-EFs-Framelits-storage

Just to the right of my dies, in a handy-dandy basket from the dollar area at Target, I keep my Embosslits, Framelits, Sizzlits, and Embossing Folders. The Embossing Folders are on the left side, facing sideways. My smaller items (Sizzlits and Embosslits) are in the Iris containers I have mentioned before.

BigShot-Framelits-DVDbox-storage

I keep all of my packaging for my Framelits (in case I need them someday) but I do take them out of the packaging and store them in these DVD cases (clear-mount stamp storage) that you can buy in a 4 pack from Stampin’ Up!  I have decorated the outside of the cases with designer series paper, but you could also make a cute insert in MDS.  I plan to do that at a later date.

Do YOU have lots of dies and embossing folders? Share your storage ideas in the comments below. And, as always, let me know if you have any questions!

How I Store My Ribbon, Buttons & Other Embellishments

In this fourth post in my “Storage Series” I share how I store all of my paper crafting embellishments.

I don’t have tons and tons of embellishments to store, so this works great for me. I have 3 different areas in which I keep my buttons, ribbons and other small embellishments:

EmbellishmentStorage3

First, my ribbon is kept in these cool ribbon trays mounted on my wall. I’d tell you more about them, but I’m pretty sure they are no longer available.  I wanted ribbon storage that was NOT on a spool, so I wouldn’t have to UN-SPOOL everything just to take ribbon to my craft table or to a workshop! I have two of them (which I will eventually fill, I’m sure) but I really don’t have much in there yet. I keep my current Stampin’ Up! ribbon, ATG refills, and (for now) my StazOn ink in the bottom tray. The top tray (not shown) has all my retired SU ribbons, and a couple of non-Stampin’ Up! items.

EmbellishmentStorage2

Second, I have the Stack and Store Caddy from Stampin’ Up! I love this item. It holds all of my buttons, brads, and other small embellishments in the containers they come in. I haven’t quite filled this up, but I am working on it!

EmbellishmentStorage1

Finally, I keep some items in these fantastic containers from Iris. They are designed to hold 4×6 photos, but I rarely use them for that. Instead you’ll find my rhinestones & pearls, baker’s twine, large buttons (too big for the Caddy) and other doo-dads that fit into the boxes. Then I keep them in the bigger box on my dresser, labels up, so I can easily find what I need!

So, that is about it for my embellishments! I really don’t have a bunch, as you can see, but I’ve designed my storage to be able to accommodate additional supplies.  I’d love to hear how you store your embellishments (in the comments!), or ask me any questions you might have!