“Spring Into Summer” Class, Coming Soon!

April 2013 "Spring Into Summer" Class

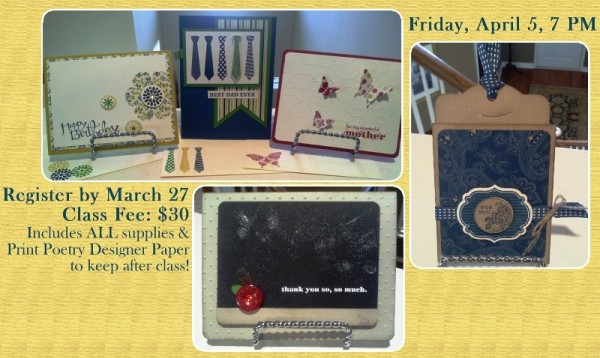
I am REALLY excited about my next class, “Spring Into Summer,” coming on April 5, 2013! I hope you will join me to make the projects pictured AND one that isn’t (yet.)

Visit my information page for more details and for the link to register to attend.  I need to know if you are attending no later than March 27 in order to prepare for you.  If you cannot make the class on April 5, contact me about purchasing a kit I can send you after the class is over.

The projects for this class can be customized to meet YOUR needs – if you don’t need a “teacher” card, you can certainly adapt it for your favorite student.  If you don’t need a Mother’s Day card, you can make yours a birthday or thank you card.

Contact me with ANY questions you have about this class.

See you soon!

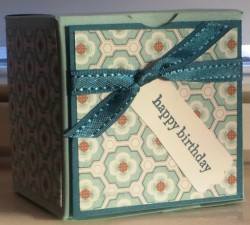
Sycamore Street Mini Birthday Box

Sycamore Street Mini Gift Box

Make your own really cute mini box without a Big Shot or loads of measuring. Simply print an MDS2 template onto card stock, cut/score, and decorate; with free Sale-A-Bration goodies!  Don’t have MDS2?  Try it out for FREE for 30 days. I think you’ll love it!

SUPPLIES I USED

Stamp: Teeny Tiny Wishes (115370 W, 127802 C), Mini Project Box-Digital Download (120171)
Ink: Island Indigo Classic Stampin’ Pad (126986)
Paper: Pool Party card stock (122924), Island Indigo card stock (122923), Whisper White card stock (100730), Sycamore Street designer series paper (127540-available only with qualifying Sale-a-Bration order)
Tools & Accessories: MDS2 (130646), at home printer, Paper Snips (103579), Bone Folder (102300), Modern Label Punch (119849), Sycamore Street Ribbon & Button Pack (130812-available only with qualifying Sale-a-Bration order), SNAIL Adhesive (104332), Stampin’ Dimensionals (104430), Sticky Strip (104294)

INSTRUCTIONS

  1. Open MDS2 and select a new blank project, sized 8-1/2×11, portrait orientation
  2. Open the stamp brush set for Mini Project Boxes and drag over the first one, the square box.
  3. With page-bleed ON, make the box template as big as you want, without going over the margins. You can also leave the box exactly as it comes over, without any adjustments in size.
  4. Using your printer and Pool Party card stock, print this page.
  5. Cut along the solid lines on your box template with Paper Snips and then score your dashed lines. Then reinforce your scored lines with your bone folder. Fold the box so that the lines printed on the card stock end up on the inside of the box.
  6. Use a ruler to determine the size of the designer series paper and card stock panels you will need for your project. The measurement will vary depending on how you sized your box in MDS2. My front DSP piece is 2”x2”, for example, so my Island Indigo piece is 2-1/8”x2-1/8.”
  7. Adhere your designer series paper onto your side and back box panels with SNAIL Adhesive. Layer a square of DSP onto a slightly larger square of Island Indigo card stock and adhere to the front panel of your box using dimensionals.
  8. Slide the Island Indigo ribbon under the raised front panel of the box, tying into a knot.
  9. Stamp the “happy birthday” sentiment and punch it out with the Modern Label punch. Adhere to the front of your box using SNAIL Adhesive.
  10. Construct your box using Sticky Strip.
  11. Fill the adorable mini box with candy, jewelry, or other small gifts and give it to your loved one!

Happy Gift Giving!

Quick & Easy Top Note Valentine’s Favor

Valentine’s Day is only a few days away! Do you need a quick & easy Valentine's project to give to friends, family, or your kid’s class? Here’s an idea!

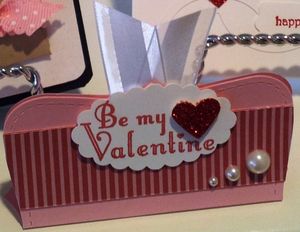
Top note Valentine's favor, Stampin' Up!

Instructions:

  1. Cut a Top Note shape with card stock (I used Pretty in Pink),
  2. Score it at about 1-3/4” on each long side.
  3. Cut a 1” x 3-3/4” strip of designer paper (I used the In Color Patterns stack in Raspberry Ripple).
  4. Stamp your sentiment (I used Delightful Dozen in clear mount) and punch it out using the Scallop Oval Punch.
  5. Layer the designer paper onto the front of the Top Note piece.
  6. Close up the Top Note favor (I used a staple) while inserting a cute strip of Whisper White Organza Ribbon inside, poking out the top.
  7. Attach the scallop sentiment with Stampin’ Dimensionals.
  8. Punch a heart with the Small Heart Punch and place over the heart on your stamped image, using dimensionals.
  9. Add some extra bling with the Pearls.
  10. Insert the candy of your choice and you are done!

This is an easy project to “assembly line” and make a bunch at a time. We did this project during my “In Love with Valentine’s Day” class and it was fast! Check out my class calendar for what’s coming up next!
Let me know what you think! If you need project ideas for an upcoming holiday or event, let me know – I can help!

Happy (Valentine) Crafting!

~Elisa

[Time Sensitive] Valentine’s Specials End Monday

There are TWO Stampin' Up! Valentine's promotions ending this coming Monday, so I wanted to make sure you saw them! 
Download Stampin' Up! Valentine Promo Flyer 

Valentine Treat Bundle

The Valentine Treat Bundle—available only through January 21, 2013—contains the exclusive Happy Valentine Heart Single Stamp and a package of 1" x 8" cellophane bags. (It takes longer to fill the bags than make the tags!) Use this sweet little bundle to create precious Valentines for your child’s classroom, your favorite neighbor, or even the special someone in your life! Single stamp coordinates with the Full Heart Punch. Clear-mount. Only available in English.

My Little Valentine Promo

This exclusive four-piece stamp set—only available through January 21, 2013—has every Valentine sentiment you need to share your love with your friends, family and coworkers. Plus, you’ll get the Sealed with Love Simply Sent Kit FREE when you purchase this brand-new stamp set! Clear-mount. Available in English, French, or Spanish.

Happy (Valentine) Stamping!

~Elisa